ADVERTISEMENT | ADVERTISE WITH US
0
Dec. 11, 2012, 5:36 a.m.

12/11/2012
By Mike Garrison
LiveRC.com
Well it has been a week now since I first embarked on this journey of Project XXX, and the fun just keeps growing. If you missed the intro to the project, you can time warp back by
CLICKING HERE to read Part 1.
After watching hours upon hours of the reality restoration and car building shows on TV, I have learned that the next step (after over paying for a vehicle) is to do what is called "The Break Down". Basically this means stripping every part off of the car from front to back and top to bottom. While doing so you have to make a pile of what will be restored, what will be junk piled, and what is in good condition and needs no work.
So I began tossing parts into their appropriate category of piles as I disassembled the beast. I was very anxious to see what I might find as this car was purchased with the title of "Race Ready...Lots of Pro Driver Mods". I got my camera ready as this was going to be a very cool inside look at how pro drivers set up their cars and the tricks they use.
After about an hour I had completely torn down the entire rear end of the car. I had carefully examined all of the parts to ensure they were organized correctly and these are my results:
Restoration Pile:
(Parts that are old and worn, but with a little work can be brought back to working condition)
(The two items placed in the "Restoration Pile" are the diffs, and hinge pins. With a fresh rebuild kit, some polishing, and a warm bubble bath these should be ready to rock and roll...I think.)
Junk Pile:
(Parts that are beyond restoration and will be welcomed and well-loved in the bottom of my trash can.)
(Left - While this appears only dusty, it features stripped out screw holes and some sort of sasquatch like odor. Right - Possibly the previous owner was some sort of oval racer had a "Pro Driver Mod" of pre-bent the tie-rods for left turns only.)
(Left - Despite its appearance, you cannot "restore" 4 bent shock shafts, and yes the ball came out with the screw as they are factory team welded together. Right - There are crush tubes inside the rear hubs, I will never see they have become one with the surrounding bearings which are apparently even older than the musty dust covers.)
(A little known fact about pro drivers is they often run CVD's until the pin breaks through, and then continue to run for a natural wear and lightening process of the drivetrain and surrounding a-arms.)
(Left - Oversized screws and nuts the size of Donkey Kong are a factory fix to a broken chassis. Right - When trying to get a medium/neutral feel to a car, simply equip one side with long ball studs and the other with short ball studs.)
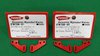
Good Condition Pile:
(These parts need no work at all and are completely ready to go!)
(I found this body clip inside of the chassis in the "belt tunnel". While it is too big to fit anything on this car, it is in MINT condition and shows no wear on it what-so-ever.)
As you can see from the pictures above, I have learned a lot. I don't feel as though I am at pro driver level to drive a machine such as this with so many "pro mods", unlike its previous owner, therefore after much debate I have decided to convert all of the "pro mods" shown back to the stock parts and condition. Part 2 - "The Break Down" is complete.
Stay tuned as Part 3 - "The Build" is coming soon...


 Eng / Usd
 Français
 Deutsch
 Italiano


Recent comments