ADVERTISEMENT | ADVERTISE WITH US
ADVERTISEMENT | ADVERTISE WITH US

By Aaron Waldron
LiveRC.com
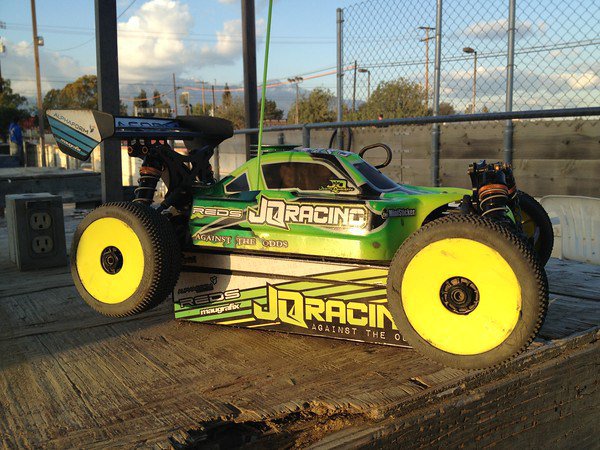
New from JQ Products:
www.jq-products.com
White Edition Setup 3.0
Been doing some more testing over the past few weeks, and discovered some new ideas and setups. THECar has improved immensely! I definitely recommend you do these modifications. We have already started developing parts so you don’t need to modify anything, but for now, if you want the best out of your car, please check this out and do the work! Here are the changes, and reasons for making them:
1. FRONT AND REAR TOWERS: We added more link holes by drilling holes above the existing ones, two more high rows on the middle column on the front, and, and two more rows above the inside column on the rear. I drilled some on the middle column too but have not used them yet. NOTE: It’s easier if you drill the hole furthest away first, and then add the hole in the middle. You need a sharp drillbit and not too much pressure, so you get the “in between hole”.

Use another shock tower as a template. You can use the front and rear together, but it is a lot better if you use two fronts or two rears as the holes on both sides match.


This is how bad I sucked on mine. I’m sure you can do better!

I improved a bit when I did the front!
The favoured setup has been to run the front link 1 up from the stock top middle hole, and the rear link two up from the stock inside top hole. Raising the links this way works wonders on the car. The balance of the car is good, and the big difference is that now getting on the gas stabilises the car. In the past, if you got in trouble, you had to be careful not to flip over. Now, one almost has to re-learn how to drive, and when in trouble, get on the gas harder to save it from getting out of shape or flipping over. The car stays lower to the ground is a lot less likely to flip over on high grip, or due to bumps.

Front preferred setup

Rear preferred setup
Please note, that you will have to re-adjust your camber. You will need to add at least 1 degree compared to what you ran before, maybe more.
2. UPPER LINK LENGTH: With the raised links, lengthening them front and back, so top outside on front, and top middle on rear, made the car easier to drive, specially in long sweepers, and on power. But testing back to back proved, that the short links were faster. It’s your choice! The car works the best when both links are short, or both links are long, not mixed.
3. FRONT SHOCK POSITION: One of the problems we wanted to get rid of, was how the front end tended to dive a lot in bumps and corners, off power, and how when attacking the track the front end was aggressive and overpowering. The initial steering unsettled the car. To solve this, we raised the front shocks up, which doesn’t help on it’s own, but combining this with using a bigger hole piston, and thicker oil, it worked great, making it possible to drive more aggressively, with the car remaining stable and predictable.

Front shocks stood up, bigger 1.3 pistons, and 101 downtravel!
The key to this is changing the piston, and making sure you get 101mm shock length for droop. The downtravel is the challenging part, as you need to grind the arm to add clearance, and also possibly the steering links as it is more travel than they offer as new. Trust me, it is worth the effort!
4. FRONT ARM POSITION: To combat the same front end issues, we tested all different arm positions, and concluded that running both front arm inserts in the highest position works best. This reduces steering a bit, but most importantly, helps keep the front end level, it doesn’t rise up so much when on power, and doesn’t dive so much when entering corners. The car is a lot better on power, and in sweepers.
5. STEERING LINKS, BUMPSTEER: We tend to run the link in the middle hole on the ackermann plate. Toe out is about 2 degrees, with the link set at 26.5mm with hard arms, and 25.5 with stock arms. As you are raising the link on the tower, you need to adjust the steering link too. The steering links have a longer flat side, please note the direction you install them. Inside is flat side down, outside is flat side up! In addition we run a 2mm shim between the ball and the ackermann plate to lower it.
6. REAR ANTISQUAT AND TOE IN: We run either 3 or 2.5 degrees of toe in, depending on the track conditions. Less if it is bumpy, or we need more steering. More if we need more rear grip, or less steering. We always use the top row now.

Top row, 3 degrees toe in.
For antisquat, the bumpier it is, the less we run. Running the toe insert all the way up, only allows for 1 degree of antisquat. If it is bumpy, like Vegas was, we reduce that to 0.5 deg, like in this sheet, .5 insert with hole up.
7. REAR HUB POSITION: Normally we like to run just 1 spacer in front of the hub, and 3 behind. In Vegas the track was bumpy, so we moved the hub back, so that it wouldn’t catch bumps so much. Moving the rear hub back reduces the bind in the suspension when on power, which makes the car better in bumps, and it also reduces rear grip which also helps.
8. +1 HEXES: The wider hexes add grip to the car. With the changes to the front end, we were now able to run the +1 hexes on the front for more steering. +1 hexes on the rear added rear grip and stability, so we run +1 all around unless we need more steering, and then we run them only on the front.
9. WEIGHT DISTRIBUTION: Part of the team run the arrows back, engine forward, which is 2mm from all the way forward. Personally in America at least, I prefer arrows forward, engine forward, which is the furthest forward you can get. Running it this way makes the car jump and land better, and I can push the car more without having the rear and get unsettled, by squatting on one corner and losing traction. The car has a bit of a push to it when entering a corner fast, and it feels safe to drive.

Mesh with engine all the way forward.
Running the engine 2mm back, puts more weight on the rear, and more grip, less steering in hairpins, unless you enter aggressively and the rear swings round. More pendulum effect. For Euro style tracks with more flowing layouts, the engine back is often more comfortable as it makes the car feel a bit heavier and calmer, which is good, but for USA, it’s all the way forward for me.
Whichever position we run, we keep the centre diff mount in the same position, 1-2mm from fully forward.
10. DIFF OILS: With the geometry of the car the way it is, it tends to like thick oils. Thicker oils add cornerspeed, and improve acceleration. Try thicker oils front and centre. For some reason, the rear seems to work best with 3000, but front, 10k – 20k, centre 7k – 10k. Don’t be afraid to run thick oils.
11. Pistons: We drilled the 7×1.3 pistons with a 1.3mm drillbit, there was a slight difference, so the holes are just a fraction larger. Barely anything, but it made a difference. Suspension is super plush! 500/300 oils have worked in temperatures ranging from 15-25C. Fahrenheit fools can figure it out. The suspension works well when it feels soft. Eventhough it feels very soft on the bench, it doesn’t feel that way on the track. Test for yourselves, but don’t be afraid of running oils that feel thin!
Why do I have to do all the work and then just hand over the information free to everyone? Then everyone wants the cars for free too. *sigh* :-p Get out there, get testing, let’s start winning!

ADVERTISEMENT | ADVERTISE WITH US
 Eng / Usd
 Français
 Deutsch
 Italiano


Recent comments